Barcode in e-mail message |
For each submitted form (result entry) a barcode is generated. You can use this when setting up your e-mail message. Most likely the autoresponder that you can create in the E-mail /SMS section under the Settrings tab.
The barcode needs to be included within the content of the email message or within the PDF attachment of the email message (which is better for printing). The scanner app supports the following barcode formats: EAN-128, CODE39 or CODE128 or QR. The barcode must be based on the entry ID. We recommend using the QR code because it can be scanned a little faster than a traditional barcode.
The barcode insertion code will then be:
[_fd_barcode(_fd_id, QR, FALSE, 200)]
The last parameter (200) indicates the height. By adjusting this you adjust the size of the QR code.
If you use the QR code, we advise you to also report the entry ID in the message, for example under the barcode. To do this, add an mergecode [_fd_id] to your form.
If you use a barcode, you can replace the 3rd parameter with 'TRUE'. The entry ID is then placed below the barcode. |
|
|
Access to the app |
To access the app you will needan API key:
User Management:
Under user amangement, create a Web API. You will need Supervisor persmissions to do so.
Permissions to form:
The Web API must have at least write permissions on the results fo the form. Any filter set will be respected.
Log in to the app:
Within the User management, you can klik on the icon places on the right in the API key field. This will display a QR code that you need to login to the app.
WARNING! The QR code contains the API key and the APY key gives access to the Formdesk account! We therefore advise to handle the QR code with care and to remove or deactivate the WEB API if it is no longer used. |
|
|
The Scanner App |
Download the App from one of these links : Apple App Store or Google Play Store.
Login
You will need to login to the app using the username and password of the user that you created. The folder name of forms is shown in the address bar of your browser when you open your form or when you are logged in to your Formdesk account:
...formdesk.com/<folder name>/......
• Folder name → Folder name of forms
• Username → your Formdesk username
• Password → your Formdesk password
Quick login scanning partners:
Once you are logged in and you have made the settings below, any fellow scanners can log in directly under the same account with the same settings. To do this, they need to scan a QR code from your mobile device. The QR code can be displayed by clicking the button at the bottom of the Settings screen. For your fllow scanners there is a button in the login screen to log in via QR code and to take over the settings.
NOTE: The API key is part of the QR code. In theory, this gives access to all data assigned to the API/User. Limit the rights of this user to the data of the relevant form only. |
|
|
Settings
Before you can start the Formdesk Barcode Scanner App you will need to complete these settings (Settings icon bottom-right of the screen):
Form:
The form for which you would like to scan the barcode. You can only scan barcodes of results of one form.
Update field:
The app will store the date&time of the scan in this field. Afterwords, you will see for each entry when exactly they were scanned within the results. In case more than one scan is allowed for each entry this field will be overwritten after each scan.
Single/Multiple scans:
Are more than one scan allowed?. Most likely not but in some cases you may want to allow multiple scans. For example, if in your form you ask for a number (eg number of persons or drinks), the barcode needs to be valid until that number of scans is reached.
Counter field:
This field is used to keep track of the number a certain entry has been succesfully scanned. It will be used to see if the allowed number of scans has already been reached.
Max scan field:
The number of scans allowed for a submitted form. This field is used to by the app to see of the maxium number of scans has been reached. This could be a field in which you ask for the number of persons or drinks.
Display fields:
The data to show after a succesful scan.
Process messages:
Indicate whether Email messages, SMS messages or Webhooks must be executed after a succesful scan.
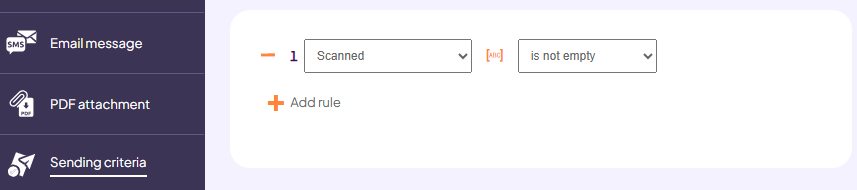
If you want to have one or more messages sent after a successful scan, you will most likely want to set sending criteria for those messages. This allows you to specify which message should be sent and when.
For example, for messages that should only be sent when the form is submitted, you will want to indicate in the sending criteria that the field in which the scan date/time is placed is still empty. While for messages that should only be sent after a successful scan, you will want to indicate within the sending criteria that the field in which the scan date/time is placed is not empty.
In the example below you can see the sending criteria of a message that must be executed after successful scanning. In this case, the update identifier is "Scanned". |
|
|
|
|
 |
|
|
Scanning
After jou have setup the app you can start scanning.
• Press the SCAN button and point your smartphone at the barcode
• You will hear a short beep after the barcode has been scanned
• Formdesk validates the barcode. If the barcode is valid then a green plane will be shown containing data as setup and the actual date&time will be registered in the field that you specified. If the barcode is invalid then a red plane will be shown with an error message
If the barcode is not clear then you have the option to manually enter the barcode (button 'Manual input'). |
|
|
Fall Back scenario |
|
Please keep in mind that at the start of your event, a connection cannot be made due to a failing internet connection or an outage of the Formdesk server. We therefore strongly advice you to arrange a fall back by taking the following measurements. |
|
|
1 Be sure to print the ID under the barcode as bescribed earlier in this manual.
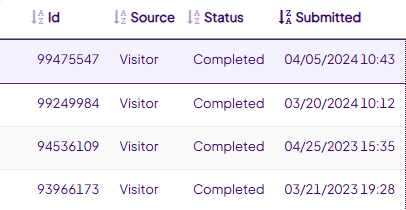
2. Prepare a print out containing information of the participants including and sorted by id (use the advanced or preset filter to select the relevant columns).
3. If for some reason the server is not available, you can search the ID of the invitation at the print out and mark it. |
|
|
|
Example PDF export / print out: |
|
|
 |
|
|
|
|
|
|
|